Gaussian Splats Pt. 4 - Drones and Further Refinements

I was able to get a DJI Flip drone for relatively cheaply during the Black Friday sales going on, after obsessing over the possibility of buying one for the last month or so. I picked the Flip for a few reasons, the main one being the class of camera that it has compared to other drones in it's price/weight class. I'm not going to go too much into technical specifics, but it basically packs the best camera you can get on a drone for under $800 and I got it for less than half of that. It's a bit of a black sheep of a device otherwise, since it lacks some of the features that experienced drone nerds find essential, but for me it is literally perfect. It is under 250 grams, which means that I do not need to register it (unless I end up using it commercially), it has propeller guards that make it a bit more newbie-proof, it's small and folds up, and it has the DJI quality of life features that I do care about like the app/phone/controller combo and programmable flight operations.
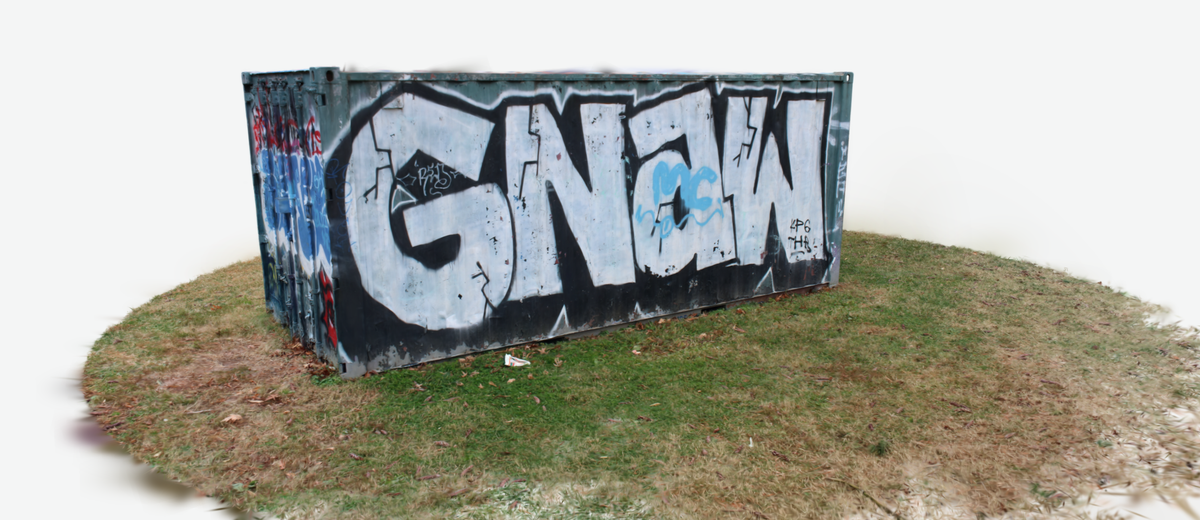
Below is the result of my first capture attempt with the drone after I took a bit to familiarize myself with the controls and general feel of actually flying the thing. I was able to capture the shipping container that I had been working on previously in higher resolution with a more consistent level of focus that made the final render much, much more sharp. The drone actually embeds it's height/position in space as well as the camera direction into the photo metadata so constructing the camera position estimates is not only more accurate, but much faster since it gives COLMAP/GLOMAP a place to base it's estimations off of. The alignment I am seeing is more accurate, which is raising the overall level of detail in my renders. Overall I am super happy with the result and absolutely sure that this is my way forward.
The camera has a really impressive feature set and outright beats the 10 year old DSLR I was using in a lot of ways, though they are entirely different purpose cameras. It has a higher resolution and better autofocus and is just easier and quicker to use for my use-case. It absolutely destroys my Pixel 6a phone camera, which uses a slew of software features to modify the image and doesn't actually capture scenes faithfully even though it is great for portraits. After my experience with my first flight I began to wonder if I could just use it as a handheld camera and kill two birds with one stone, since it folds up nicely and the camera is able to function while not exclusively airborne. This would allow me to use it easier indoors and also at ground level while the battery is low. Turns out someone else thought of this as well and I was able to find a 3D printable model that act as a handheld rig for the drone, which makes it easy to hold both the drone and my phone at the same time (since the phone controls the drone camera).
I'm planning on recapturing all of the larger subjects that I have worked on so far with the drone camera. As of right now I have recaptured the shipping container, the Wyman Park bridge, and the Roosevelt Park skate park but still need to play around with the camera settings on the drone to figure out what would produce the best images. The shipping container looks much better, but there is still some lack of fill and distortion in areas of fine detail which I think is due from the digital sharpening used by the drone camera by default.
I'm learning a lot about photography by messing with all this. Per reddit I also probably need to invest in some ND filters, which are used to get better control over exposure settings by reducing the amount of light entering the camera lens. Less light means that you can use longer shutter speeds and wider apertures while avoiding over-exposure of the image. I need to dig more into this, I am familiar with the ISO-Aperature-Shutter Speed interplay but not knowledgeable enough to know what I need exactly to get the best quality shot.
I have also been experimenting much more with the render workflow, and was able to rent a virtual workstation with an Nvidia 5090 for $0.65 an hour. The settings in Brush are still a bit opaque by my understanding but by renting this more powerful machine I was able to iterate and experiment a good amount relatively quickly. I put in 20 bucks and was able to do a few dozen render tests with multiple scenes, while keeping a log of settings changed and corresponding results. From the Brush readme and some help on the Discord, I was able to simply my experimentation and focus on what settings were mainly responsible for increasing splat count. So far I've found that these settings bring the most change to detail (and VRAM usage):
- Raise growth_select_fraction from 0.2 to 0.3 (or 0.4)
- Reduce growth_threshold from 0.003 to 0.002
- Lower refine_every, depending on size of scene
- Raise growth_stop
- Raise iterations
By tweaking these the scene refines more often and generates more gaussians for a longer amount of time, but also paradoxically seem to add transparency in places where there was none previously. In the larger scenes I am getting much more fine detail but I believe I am hitting the limit of what my local and rented VRAM can produce. Transparent areas are usually spaces like sidewalks where there is a consistent color, so I'm assuming it is prioritizing the visually busy areas instead. I will have to test further.